

Suspension Trainer X-Mount Installation
Dimok X-mount Installation Instructions for Ceilings or Concrete Walls Using Lag Shields
Important Safety Notice – Professional Installation Recommended- Only mount to strong load bearing walls or overhead beam
- 750lb Max Working Load
Included Parts
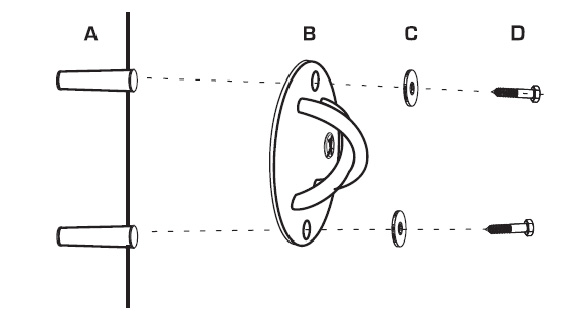
A. Two lag shields (3/8" x 2 7/16")Parts Included with X-mount
B. (1) XmountC. (2) Washers
D. (2) Lag Bolts (3/8" x 3")
X-mount Installation
- Find a location to install the Xmount (7' – 9' concrete wall or ceiling).
- Place X-mount (B) with logo facing up and mark holes with a pencil.
- Drill pilot holes 3" deep using a 5/8" concrete drill bit.
- Tap lag shields (A) into the pilot holes until they are flush with the wall or ceiling.
- Place washer (C) onto the lag bolt (D) and insert the lag bolt through the top hole of the X-mount (refer to drawing). Screw lag bolt into the shield using a ratchet or drill. Do not fully tighten bolt.
- Repeat the steps to install the lower lag bolt and then fully tighten both lag bolts.
- X-mount should be flush to the wall or ceiling when installed and have no movement or play in any hardware.
- Attach the Dimok Suspension Trainer to the newly installed X-mount and test for proper installation. Perform a weight test by pulling down hard on the suspension trainer. The X-mount should stay firmly fixed and should not move.
Dimok X-mount Installation Instructions for Wooden Studs of Ceilings or Walls
Important Safety Notice – Professional Installation Recommended- Only mount to strong load bearing walls or overhead beam
- 750lb Max Working Load
Included Parts
A. (1) XmountB. (2) Washers
C. (2) Lag Bolts (3/8" x 3")
X-mount Installation
- Use a stud finder to locate a strong wooden stud inside a wall or the ceiling, about 7' - 9' from the ground.
- Place X-mount (A) with logo facing up and mark holes with a pencil.
- Drill pilot holes 3" deep using a 1/4" drill bit.
- Place washer (B) onto the lag bolt (C) and insert the lag bolt through the top hole of the X-mount. Screw lag bolt into the stud using a ratchet or drill. Do not fully tighten bolt.
- Repeat the steps to install the lower lag bolt and then fully tighten both lag bolts.
- X-mount should be flush to the wall or ceiling when installed and have no movement or play in any hardware.
- Attach the Dimok Suspension Trainer to the newly installed X-mount and test for proper installation. Perform a weight test by pulling down hard on the suspension trainer. The X-mount should stay firmly fixed and should not move.